How to blow your whistle

Ok, stay with me. I know what you’re thinking. Why do I have a post about how to blow a whistle? Everyone knows how to blow a whistle – you just put it in your mouth and blow, right?
WRONG.
I know it seems funny, but it wasn’t until I had been umpiring for a good many years before someone actually told me specifically how to blow a whistle. Of course I had been blowing my whistle on the pitch, with some variation and varying levels of success – but it was common for me to hear in my feedback that I needed more variation in my whistle tone, more authority, more communication. I heard this again and again but, whilst I tried to improve it, I didn’t really know how.
Your whistle is your primary voice on the pitch. You can use it to communicate so much more than just a free hit. Variation in tone and length gives you so much more authority on the pitch. The right tone, volume and length will let everyone know when you’re not happy with something or if a free hit was just a little inconsequential foul. It will let the people know if you just want the ball repositioned or allow you to blow a THAT’S-THE-MOST-AMAZING-GOAL-I’VE-EVER-SEEN type of goal.
When I was umpiring at the Pacific Games in Papua New Guinea our umpire’s manager, Paul Morrison, took the group for a whistle practicing session. We felt foolish but we learned how to use our diaphragms to push the air through our whistles and how to vary our whistle tone. It’s hard to believe, but this was the first specific whistle technique lesson I had had. And having other people around to give immediate feedback was very helpful. So, I thought putting together a whistle technique post might also be helpful to people. So here are some tips and tricks to help improve your whistle tone and variation, what type of whistle to use and some general other advice…
How to blow your whistle
Whistle technique
- It’s all about the angle
Ok, let’s get the basic one out of the way first. It might seem obvious but it needs to be said. When you put your whistle in your mouth to blow, angle it slightly downwards. This will allow the sound to travel away from you across the pitch, rather than straight back into your own ears! Simple? Yes. Obvious? Maybe. But gosh, it makes a world of difference. Your whistle might sound loud to you, but if you’ve got it straight in your mouth you’re probably the only person it sounds loud to…! Angle it down and let the world (ok, maybe just the surrounding area) hear you roarrrrr…I mean whistle!
- Take a breath…
A lot of people blow a whistle like they are trying to blow up a balloon. They fill their mouth with air and then push this air through the whistle to make the sound. I mean, it works, but it doesn’t give you that crisp, sharp sound that makes pro umpires sound – well, pro.
You should be using your diaphragm (your belly/stomach/tummy/whatever you want to call it) to force the air. Building the pressure from your gut by using your stomach and lung muscles will allow you to force more air, faster, and for longer if necessary, through the whistle. This will allow you to achieve a louder, sharper sound that will give you more authority on the pitch and make you sound more confident and professional.
- Use your… tongue?
The other trick to get that sharp sound is to use your tongue. Put your tongue against the end of the whistle, build up pressure by blowing and then release your tongue to let the air pass through the whistle in one sharp burst. You then put your tongue back on the end of the whistle to cut off the sound quickly. This results in a much sharper sound instead of building up and then trailing off. This can be used for every whistle you blow, but is also very useful in making several short, quick blasts one right after another to grab people’s attention. By moving your tongue on and off the end of the whistle quickly you can make short sharp blasts faster than you could blow into the whistle in quick succession.
Here are some great videos on YouTube that help to show the differences and explain the techniques:
Breathing techniques:
https://www.youtube.com/watch?v=HBs923lw1MI
How to use your tongue:
https://www.youtube.com/watch?v=31WeXRrxG_U
BUT, it’s one thing to read about these techniques or watch a video; it’s a completely different thing to do them yourself. So, practice makes perfect! Go down to your local park and give it a try (practicing at home might annoy your family or neighbours and could potentially damage your hearing…). Get someone to stand 50-100m away from you and tell you if your whistle was sharp/loud/authoritative enough. I know it sounds silly, but this really is the best way to improve your whistle tone!
Also, next time you’re out watching a game listen to the umpire’s whistle. You should be able to tell what is going on on the pitch, even if you’re not watching. Listen to how they vary their tone. Do they command authority? Could you incorporate something from their style in to your own? Could they do it better? Do they do it differently from you? Learning from others is a great way to also improve your own style.
Whistles 101
But what about the actual tool of the trade? Let’s talk it through…
- Which whistle?
Rule #1 – Repeat after me: Never, ever use a pea whistle.
Why? Because they’re rubbish. They don’t sound good and they are fraught with danger – particularly if the pea is made from cork. If it gets too wet (from rain or spit) they can expand and then they don’t make noise anymore. If it gets too cold the pea can freeze to the inside of the whistle and then they don’t make noise anymore. And you just can’t achieve the same crisp, authoritative sound that we worked so hard to achieve in the section above.
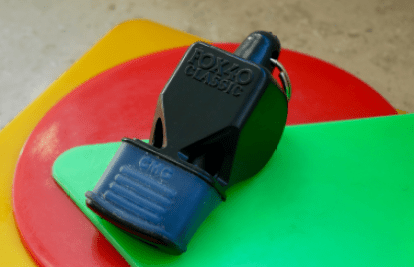
Pea-less whistles are definitely the way to go. Beyond that, it largely comes down to personal preference. The size, shape, sound and feel of a whistle in your mouth with determine what you like and don’t like. I’ve tried a lot of whistles but my personal favourite is the Fox 40 Mini with the cushioned mouth grip (you can get them from heaps of places, but here is the link to the product page). It’s smaller, has a great sound and I really like the mouth grip thing as it stops me slamming my teeth into the whistle – but then again, I’m a bit un-co (un-coordinated). A lot of people don’t like the mouth grip, but I’m a big fan.
- Pro tip
Rule #2 – ALWAYS keep a sneaky spare on your person.
The backup whistle, which you keep in your pocket, is a LIFE SAVER. Honestly. If you only have one whistle in your hand or on your lanyard (which we’ll get to in a minute), it’s a must-do. Even if you have 2 whistles together, a spare in the pocket is a good idea.
I used to have nightmares about my whistle not working. Actual nightmares. I know, I’m the biggest loser ever, but hey, I’m opening up here – don’t judge me. Anyway, I would dream that I’d blow my whistle and no noise would come out. Or that I dropped my whistle on a break away and then they ran up the field and scored whilst I was at the half line looking for my whistle on the ground. Can you image? It makes me shudder even now. So I always carried a spare whistle in my pocket, just in case…
BUT THEN IT HAPPENED TO ME GUYS. IN MY FIRST BIG-LEAGUE INTERNATIONAL GAME. I spat my whistle out as I blew it, the players took that free hit so fast and I had to bolt up the field. With my whistle still on the ground at the halfway line. The horror.
BUT, I had my trusty spare whistle in my pocket to save me. No dramas. No one even noticed, except the ball kid who kindly handed my whistle back to me at half-time. Thanks mate!
Less dramatically, it’s also great if you drop your whistle on the ground and just don’t want to put it back in your mouth yet – gross.
- To lanyard or not to lanyard, that is the question…
Rule #3: Never wear your whistle around your neck or use a finger-grip whistle. You’ll look like a newbie.
How to hold your whistle? This also comes down to personal preference – but I will say this: the higher up the ladder you climb, the more simplicity in your presentation matters. It simply doesn’t look super professional to have a big lanyard dangling from your mouth. You can wrap it around your hand, but it’s better to either have just your whistles or to have a wrist-lanyard instead.
The most common ways of holding your whistle are listed below. Each has it’s pros and cons and you need to find what works for you.
- Just the single whistle, flying solo (this is what I do – make sure you have a spare in your pocket!).
– Pro: Clean, simple, looks professional. Give you flexibility to use both hands and whistle at the same time, or to swap hands.
– Con: Easier to drop/spit out. - Two whistles joined together – you hold one in your hand and blow the other one.
– Pro: You’ve got a bit more to hold on to and you get the flexibility listed above.
– Con: You have an extra whistle dangling down out of your mouth. You can also drop it. - One or two whistles on a lanyard
– Pro: You won’t drop it.
– Con: You can’t change hands or use both hands to, say, to blow a goal/PC/PS and whistle at the same time.
So, I hope this has helped to give you some tips on how to improve your whistle tone and technique! Has anyone specifically taught you how to blow a whistle? Do you use these tricks already and what impact does it have on your umpiring? What whistle do you use and how to do you hold it? Let me know in the comments below!
Check out some other tips to take your umpiring to the next level on the Development page. Also, did you know you can make sure you never miss a post by signing up to the newsletter? You can sign up using the form in the sidebar to the right. Don’t worry, I value your inbox just as much as my own and I promise never to spam you!
For behind the scenes action and extra tips and tricks, follow me on Facebook, Instagram and Pinterest. And if you liked this post, why not share it using the buttons below?

You must be logged in to post a comment.